Transport Controls

Track Information


LCD Window
The LCD has five modes: Time, Measures, Chord, Tuner, and Project. Click the icon at the left side of the LCD and choose a different mode.
(Note: The tuner mode is only available for real instrument tracks and guitar instrument tracks. Chord mode is only available for software instrument tracks.)

In Project mode, you can choose a different key and time signature for the project, and change the project tempo.

In Measures mode, the LCD shows the playhead’s position in musical time (measures, beats, ticks). Drag or double-click the numerals to move the playhead.

In Time mode, the LCD shows the playhead’s position in absolute time (hours, minutes, seconds, fractions). Drag or double-click the numerals to move the playhead.

In Tuner mode, you can tune a guitar in either an Electric Guitar or Real Instrument track.


In Chord mode, you can see chord symbols when you play any Software Instrument.


Track Volume- Master Volume
Use the Master Track "Master Volume" to adjust all of the tracks at the same time. This is located at the bottom of the window.

You can adjust the volume of the track by sliding the dot.

Media Browser
The Media Browser allows you to view media that can be added to your project. This includes items from iTunes, iMovie, and iPhoto as well as other projects from GarageBand. There are two ways to view the Media Browser.
1. In the GarageBand Drop-down Menu, select Control > Show Media Browser. The shortcut for the Media Browser is Command - R.
1. In the GarageBand Drop-down Menu, select Control > Show Media Browser. The shortcut for the Media Browser is Command - R.

On the bottom-right corner of GarageBand, click on the Media Browser Icon located next to the Loop and Track Info Browsers.

There are three tabs under the Media Browser (Audio, Photos, and Movies). When you click on a tab, specific media will drop-down below.

Audio Tab
The Audio Tab stores any and all audio tracks that you may wish to use in a project. This includes your entire iTunes Library as well as any GarageBand projects. To preview these files, select the file from the list and click the Play button in the lower-left corner of the Media Browser window. You can also preview the track by double-clicking on the track. To stop the recording, click the Play button again or select another file.

To import an audio track, click and drag the file onto the track window. A new track will be created for the selected file.
Photos Tab
The Photos Tab any and all pictures uploaded and saved in your iPhoto Library. When you select the iPhoto icon or any drop-downs from the iPhoto icon, the media in that folder will appear in the Media Browser window. To preview a photo, double-click on the photo and the photo will enlarge in the same window as the other photos. To close the picture, click once on the enlarged photo.

To import a photo, click and drag the file onto the track window. A new track will be created for the selected file.
Movies Tab
The Movies Tab stores any and all movies uploaded and saved in your iMovie Library or iPhoto Booth. You may also view any movies and podcasts stored in your iTunes Library. To preview a movie, select the file from the list and click the Play button in the lower-left corner of the Media Browser window. You can also preview the movie by double-clicking on the track. To stop the recording, click the Play button again or click once on the enlarged movie.

To import a movie or podcast, click and drag the file onto the track window. A new track will be created for the selected file.
Software Instruments

- Select a family of sounds from the left side column (such as Piano and Keyboards)
- When you click on a family of instruments, all the instruments in the family will appear in the right column.
- By playing the keyboard, you can audition the sound you wish to play.
Setting Up a Guitar (or Bass) Track
1. Start by clicking the 'Add Track' button

at the lower-left corner of the project window.
2. Select the 'Electric Guitar' from the menu and click create.
at the lower-left corner of the project window.
2. Select the 'Electric Guitar' from the menu and click create.

3. Connect the instrument to GarageBand using a 1/4" phone jack from the guitar to the audio interface, OR a USB guitar cable/interface such as the Stealth Cobra.
4. GarageBand should automatically recognize the new input source. If not, double-click on the amp in the track window and set the cable or interface as the input source.
4. GarageBand should automatically recognize the new input source. If not, double-click on the amp in the track window and set the cable or interface as the input source.

NOTE: GarageBand will automatically change the output source to the cable or interface. Go to: GarageBand-> Preferences -> Audio/MIDI and change the output source to built-in or external speakers.


Loop Browser
Click on the eye to access Loop Browser (the loop browser appears to the right of the Track Window).

If you're using a NEWER version of GarageBand, these loop icon has changed


Choose a loop by genre, instrument, or mood. Choose a loop and click below to preview loop.
In Column View, choose loops by genre, instrument, or mood. Click the name to preview the loop. You can also save the loop as a favorite in the check box.
Once you have selected your loop, you can drag this into your Garage Band project. Click on the name of the loop and drag it into an empty area of the Garage Band track window. This will set up a new instrument and create a new track to play your loop in the project.
In Column View, choose loops by genre, instrument, or mood. Click the name to preview the loop. You can also save the loop as a favorite in the check box.
Once you have selected your loop, you can drag this into your Garage Band project. Click on the name of the loop and drag it into an empty area of the Garage Band track window. This will set up a new instrument and create a new track to play your loop in the project.
LOOP SEARCH
If you would like to search for a loop, there is a search window at the bottom of the loop browser. Just type in the name, or part of the name of the loop you are looking for and press enter.

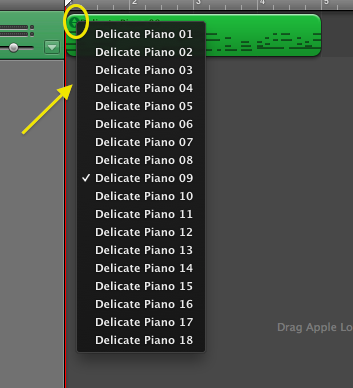
A COOL WAY TO CHANGE BETWEEN LOOPS IN "LOOP FAMILY": DROP-DOWN MENU IN REGION
If you are working on a project and would like to change a loop to another loop that is similar to one you have already used, there is a drop-down menu that you can click on to automatically see similar loops.

Audio Region
Segment of track containing waveform audio; may be mono or stereo.

COLORS:
- Purple = voice or instruments recorded w/mic or audio interface.
- Amber = imported from outside the program.
- Blue = Audio loops.
REGIONS may be:
- Copied - Select region; Edit --> Copy (or, ⌘-C); then move playhead to paste location (and select new track if copying into different track); Edit --> Paste (or, ⌘-V).
- Split - Place playhead at Split location; Edit --> Split (or, ⌘-T).
- Joined - Shift-click two (or more) Regions; Edit - Join (or, ⌘-J).
- Looped - Float cursor over the top-right corner of Region; a curly arrow (loop icon) appears. Click-hold-drag the Region's curly arrow to the right replicate the loop as many times as desired.
- Shortened - Float cursor over the bottom-right corner of Region; a Resize tool ("line" icon) appears. Click-hold-drag this tool to the left to shorten the loop.
Try this!
GREEN: MIDI Data (MIDI Loops and Recording)
BLUE: Digital Audio Loops (Audio Recorded and Audio Loops)
PURPLE: Digital Audio Recorded by a Guitar/Bass
BROWN/ORANGE: Digital Audio Recorded Outside of, then Imported into, GarageBand
YELLOW: GB's "artificial intelligence" drummer track
DISCUSSION QUESTIONS:
- How is AUDIO represented in GarageBand?
- What is MIDI (or MIDI data)?
- How is MIDI data shown in GarageBand?
- What's the difference between the audio represented in the BLUE and the AMBER regions?
- When a GarageBand file plays back, what is the vertical line that indicates the current position in the song called?
- What is a LOOP? What is the difference between audio loops and MIDI loops?
To CHANGE KEY or TEMPO
Be sure to check the "Follow Tempo & Pitch" checkbox for the audio region.
NOTE: Control-Option-G on a yellow "imported" track and it turns into a purple "recorded" track - then you can pitch shift it (in the Edit Window).
NOTE: Control-Option-G on a yellow "imported" track and it turns into a purple "recorded" track - then you can pitch shift it (in the Edit Window).
Is this file MIDI or Audio?
MIDI loops can be realized by a software instrument track (green) OR converted to audio and played in a real track (blue).

Midi Region
Segment of track containing recorded (or "step entered") MIDI data (i.e. notes, durations, velocity, etc.).

REGIONS may be:
- Copied - Select region; Edit --> Copy (or, ⌘-C); then move playhead to paste location (and select new track if copying into different track); Edit --> Paste (or, ⌘-V).
- Split - Place playhead at Split location; Edit --> Split (or, ⌘-T).
- Joined - Shift-click two (or more) Regions; Edit - Join (or, ⌘-J).
- Looped - Float cursor over Top-Right corner of Region; a curly arrow (loop icon) appears. Click-hold-drag the Region's curly arrow to the right replicate the loop as many times as desired.
- Shortened - Float cursor over Bottom-Right corner of Region; a resize tool ("line" icon) appears. Click-hold-drag this tool to the left to shorten the loop.
EDITING MIDI DATA
- Double-click in the region of the MIDI track you want to edit to open the track editor. From the track editor at the bottom of the window, you may edit using the piano roll, as pictured above, or using a score view, as pictured below.

CHANGE DURATION OF NOTE
- Select the note by clicking once on the rectangle/note. Then, float the cursor on the right end of the rectangle or one the note. Click and drag to the right to lengthen the duration. Click and drag to the left to shorten the duration.
MOVE NOTE IN THE METER
- Select the note by clicking, then drag the rectangle/note to the right or left, aligning the note to the beat, division, or subdivision.
CHANGE PITCH OF NOTE
- Select the note by clicking and dragging the rectangle/note up or down to change the note to the appropriate pitch.
Zoom Slider
For very precise work, you may need to zoom in.

Drag the zoom slider to the right for a closer view...
...or zoom out to see more of the track or selected region.
...or zoom out to see more of the track or selected region.

Drag the zoom slider to the left when you want to see the whole song at a glance.
Automation Drop Down Menu
Track Volume Automation

Select Track Volume from the drop down menu
Set BREAK POINTS along the line to adjust dynamic for each individual track.
Move points to adjust volume up or down
UP is loud. DOWN is soft/silent
Rising Diagonal line is crescendo
Descending Diagonal line is diminuendo
Straight Line Down is abrupt change (dropping out)
Straight Line Up is abruptly loud
Track Pan Automation

Select Track Pan from the Drop down menu
Set BREAK POINTS along the line to adjust balance between right and left.
Move Break Points up or down to adjust pan from Left to Right
Top is the LEFT
Bottom is RIGHT
Diagonal is gradually shifting between right and left
Middle is equal sound on both sides
"Lock Automation Curves to Regions": IF YOU WANT YOUR AUTOMATION to move with REGIONS as you slide them right/left, choose "Lock Automation Curves to Regions" from the Control Menu.
Set BREAK POINTS along the line to adjust balance between right and left.
Move Break Points up or down to adjust pan from Left to Right
Top is the LEFT
Bottom is RIGHT
Diagonal is gradually shifting between right and left
Middle is equal sound on both sides
"Lock Automation Curves to Regions": IF YOU WANT YOUR AUTOMATION to move with REGIONS as you slide them right/left, choose "Lock Automation Curves to Regions" from the Control Menu.
Effects Automation (Visual EQ, Echo & Reverb)

Select Add Automation from the Drop down menu
Select Visual EQ and/or Echo & Reverb from the pop-up Add Automation window
Place a checkmark in the box of all desired effects
Go back to the Drop down menu and select the desired effect which now appears
(Bass Gain is selected in Figure 1.4)
Select Visual EQ and/or Echo & Reverb from the pop-up Add Automation window
Place a checkmark in the box of all desired effects
Go back to the Drop down menu and select the desired effect which now appears
(Bass Gain is selected in Figure 1.4)

Echo & Reverb
Set BREAK POINTS along the line
Click and drag Break Points up or down to adjust the amount of Echo or Reverb.
UP adds Echo or Reverb
Down reduces Echo or Reverb
VIsual EQ
Set BREAK POINTS along the line
Click and drag Break Points up or down to adjust the amount of Gain or Change the default Frequency
UP adds Gain or raises the frequency to be automated
Down reduces Gain or lowers the frequency to be automated
Set BREAK POINTS along the line
Click and drag Break Points up or down to adjust the amount of Echo or Reverb.
UP adds Echo or Reverb
Down reduces Echo or Reverb
VIsual EQ
Set BREAK POINTS along the line
Click and drag Break Points up or down to adjust the amount of Gain or Change the default Frequency
UP adds Gain or raises the frequency to be automated
Down reduces Gain or lowers the frequency to be automated
Track Tools

1. Record Button - Enables or disables recording for a track.
- Clicking on a track enables recording for that track.
- When recording is enabled, the button turns red.
2. Mute Button - Mutes or unmutes a track.
- More than one track can be muted at the same time.
- When a track is muted, the button turns blue.
3. Solo Button - Solos or unsolos a track.
- More than one track can be soloed at the same time.
- When you solo multiple tracks, you hear all of the soloed tracks. All tracks not soloed are silent.
- When a track is soloed, the button turns yellow.
4. Lock Button - Locks or unlocks a track.
- When a track is locked, it cannot be edited.
- If you have too many unlocked tracks and your project will not play back, locking the tracks will free up processing power and allow the project to play back.
- When a track is locked, the lock will be closed and the the button will be green.
5. Auotmation Button - Enables auotmation for a track.
- Track volume will appear to allow for automation.
Resize/Shortcuts

⌘C- Copy (easy way to duplicate a loop)
⌘V- Paste (put back cut or copied region)
WARNING! - Information will paste only on selected track and where play head (red line) is located
⌘Z- Undo (It will get rid of your mistake!!)
⌘A- Select All (used to select the entire set of data)
⌘T- Split (used to break a loop into small parts… see below)

⌘S- Save (Do this often!)
Resize
To resize a region:
Move the pointer over the lower-right edge of the region.
When the resize pointer appears, drag the lower-right edge of the region to shorten or lengthen it.

Master Track Automation
Select "Show Master Track" on the Track menu to reveal the Master Track.

Select from the drop-down menu to choose master volume, pitch or tempo to automate globally from the entire production.
Break points can be inserted to make changes to the piece for that particular parameter.


Preferences
PREFERENCES MENU

1. Go to GarageBand menu and highlight Preferences
2. The next screen shows five tabs including General, Audio/MIDI, Loops, Advanced, and My Info.
3. Under this General Tab, choose to configure the following:
- Metronome- during recording or during playback and recording
- Cycle Recording- check this box to overdup record (while listening to other tracks). You will record in addition to the other tracks.
4. Click the next tab Audio/MIDI

Optimize for- choose accordingly; whether you have many simultaneous tracks playing or not
MIDI Status
Choose Keyboard Sensitivity
5. Click on Advanced Tab

To optimize performance, choose a a specific number of tracks under the following:
- Real Instrument Tracks
- Software Instrument Tracks
- Voices per Instrument

You may use this option to optimize performance if you know you will use 8 or less tracks
Overdub Recording
The overdub function allows you to record or make changes in a track without erasing what's already there.
The overdub button (really, the "Cycle Record" button) is located just to the right of the play button.

After you select the overdub button, it will turn blue.


At this point, you can record into the existing track without erasing what's already there. You can even overdub with the pitch bend wheel or sustain pedal to affect certain notes within the track. You can also add notes with this function.
The overdub button (really, the "Cycle Record" button) is located just to the right of the play button.
After you select the overdub button, it will turn blue.
After you have recorded a track that you would like to add to, turn on overdub.
A yellow bar will appear above the tracks. Overdub will only alter the track selected.
At this point, you can record into the existing track without erasing what's already there. You can even overdub with the pitch bend wheel or sustain pedal to affect certain notes within the track. You can also add notes with this function.
DSP Pluggins (Effects)
DSP (Digital Signal Processor) - Effects such as: Reverb, Chorus, Normalize, Equalization (EQ), Compression/Gain.
To add and adjust track effects:
1. Double-Click the track's header to open the Track pane.
2. Click Edit to show the track's effects (for Electric Guitar tracks,select the amp before clicking Edit).

3. Click the rectangular LED on the left side of an effect to turn the effect on or off.
4. Choose a new effect preset from the pop-up menu below the effect name. Presets have names that help you choose a new effect preset from the pop-up menu below the effect name. Presets have names that help you understand their intended use.
5. Add an effect by clicking an empty effect slot, then choosing an effect preset from the pop-up menu that appears.
6. Reorder effects by dragging them up or down in the Effects area.
7. Changing the order of effects can change the sound dramatically, especially for the Amp Simulation, Distortion, and Overdrive effects.
Turn off an effect by clicking its LED again.
To add and adjust track effects:
1. Double-Click the track's header to open the Track pane.
2. Click Edit to show the track's effects (for Electric Guitar tracks,select the amp before clicking Edit).
3. Click the rectangular LED on the left side of an effect to turn the effect on or off.
4. Choose a new effect preset from the pop-up menu below the effect name. Presets have names that help you choose a new effect preset from the pop-up menu below the effect name. Presets have names that help you understand their intended use.
5. Add an effect by clicking an empty effect slot, then choosing an effect preset from the pop-up menu that appears.
6. Reorder effects by dragging them up or down in the Effects area.
7. Changing the order of effects can change the sound dramatically, especially for the Amp Simulation, Distortion, and Overdrive effects.
Turn off an effect by clicking its LED again.
Chord Mode
If you would like to know what chords are being played in your green midi tracks, go to bottom of Garage Band and enable the LCD screen to CHORD mode.

Chord names will appear as you are playing.

To tune your instrument in Garage Band select TUNER in the LCD screen. This only works with audio tracks (blue).

Plug in your instrument and play a tuning note and the pitch will appear in red.

Chord names will appear as you are playing.
To tune your instrument in Garage Band select TUNER in the LCD screen. This only works with audio tracks (blue).
Plug in your instrument and play a tuning note and the pitch will appear in red.
Arrange Tracks
The Arrangement Track function allows you to place "markers" or label the form of your production.


1. Click "Track" from Menu bar; select "Show Arrange (or Arrangement) Track". (Picture Above Left)
2. Click "+" sign that appears next to the word, "Arrangement" in the area that appears. You can adjust the length of the bar that appears (drag it longer and shorter).
3. Double-click in the middle of the bar and a text field appears in which you can type the name of the marker/label.
Podcast or Video Track
Here is how you open the Movie Track:

Creating a movie in GarageBand
- Once you've opened your Movie Track, insert a video into GarageBand by dragging a QuickTime Movie file into the movie track.
- If the audio track shows up as a separate track you can delete it and start with fresh audio created by you.
- Insert music or sound effects using the software instruments and loop browser using additional tracks, just as you would with any other audio project.
- As you work you can view the movie for easier editing in a larger screen (which can be moved around or made larger by pulling on the lower right corner) by clicking on the small screen in the Movie Track title. This video can be controlled by the playhead to start and top in order to easily time sound effects with the action.
 |
| Click the little picture next to Movie Track |
 |
| Larger video will play in front of project |
BE AWARE!!! If the tempo of your MIDI music is an issue in your video, make sure you've decided on the correct tempo BEFORE inserting any other sounds that need to be synchronized to the video. If you change tempo mid-project all of your synchronization will be completely changed.
GarageBand Key Command Short Cuts
Using QWERTY Keyboard

Command Key ⌘ "B" - Show Master Track
Command Key ⌘ "C" - Copy
Command Key ⌘ "D" - Add Track (last kind created)
Command Key ⌘ "Delete" - Delete Track
Command Key ⌘ "J" - Join Tracks
Command Key ⌘ "S" - Save
Command Key ⌘ "T" - Split Tracks
Command Key ⌘ "V" - Paste
Command Key ⌘ "X" - Cut
Command Key ⌘ "Z" - Undo
M = Mute
R = Record
S = Solo
Return or Home Key = Takes you to beginning of work
End Key = Takes you to end your work
Space bar =Stop/Start

Shift, Command Key ⌘, 3 = Takes photo of the entire screen
Shift, Command Key ⌘, 4 = Take photo of highlighted area
Using GarageBand to Transpose a Song Imported from iTunes
If you have Garageband 10.0.3, follow these steps:
1) Open GarageBand. Select “Empty Project” and press “Choose”

2) Next, select “Software Instrument” and click “Create”

3) GarageBand creates a Piano track for you.

4) Open iTunes and drag the song you want in import under the piano track that was created for you.

5) Your track appears under the Piano track.
 6) Open GarageBand > Preferences…
7) Select Audio/MIDI. Click on “Audio Units” to enable this effect.

8) When prompted, “Keep” existing effects, if you wish.
9) In the upper-left of the window, Look for the “Smart Controls” button, which looks like a knob.

10) Click the “Knob” to select “Smart Controls”

11) Look for the “i” and “Master” buttons.

12) Click the “i” and “Master” buttons.

13) Hover above the top processor (which is “Channel EQ” as shown above). Click and hold the blue line that becomes visible:

14) Next Select “Audio Units > Apple > AUPitch”

15) Adjust the Pitch to your liking.

16) Note that you can double-click on the number of cents and put in an exact amount. These should be multiples of 100, if you want to go up or down by semi-tones. Each 100 Cents is one semi-tone. One octave is 1,200 Cents.
Old Version of GarageBand
First, create a new song in GarageBand
Open GarageBand and create a new song. Command-N will create a new song, too.
Next, drag the song you want to transpose from iTunes into GarageBand

When you drop the song into GarageBand, it will create a track and color it orange. This means that it is an imported song. (In GarageBand a recorded song is purple).

Next, click in the track region to see the audio graph.
Here’s the trick! Press control-option-G and click the track again.
This trick is not documented in the help file for GarageBand, but it is a great tip for changing an imported track from orange to purple, making it available for more editing options.

Now we Edit the Track
Press the Show Editor button (or press Command-E).

The Show Editor button is highlighted in blue above.
Here’s how the Editor looks at this point:

Now, click the box for “Follow Tempo & Pitch”

Slide to Your Heart’s Content
But don’t get crazy. You can make the song sound pretty bad. If you want crazy vibrato or if you don’t mind the change in tempo, by all means, move the slider all the way to -12 or +12. A more reasonable amount might be (+ or -) 2.

There you have it. Your song has been transposed for you. It’s really amazing.


